Noteshelf app Tips and Tricks
Mastering Noteshelf: Backup, Features, and Tips for iPad Users
1) How to Backup Noteshelf Data
There are several ways to back up your data in Noteshelf. The first method saves your data in iCloud by default, while the second one, which is not enabled by default, requires manual activation. Let’s turn it on together:
- Open the Noteshelf document gallery.
- Click the button - settings.
- Tap the menu item - Cloud & Backup.
- Activate Auto-Backup data.
4.1) Select the storage you are using.
A small life hack: If you use multiple devices, such as Noteshelf on an iPhone and an Android tablet, select Google Drive as the auto-save option on both devices (ensure you’re using the same Google account). This way, all your notes, including your digital planner Noteshelf files, will automatically synchronize between your iOS and Android devices.


2) Does Noteshelf Work on iPhone?
Absolutely! Noteshelf works seamlessly on an iPhone. However, due to the smaller screen size, an iPhone is more suited for digital planner Noteshelf viewing or referencing digital notes created on a larger device, like an iPad or Android tablet. For tasks like writing, sketching, or using digital stickers for Noteshelf, an iPad or Android tablet is the better choice.
3) How to Use Noteshelf on iPad
Noteshelf offers endless possibilities when used on an iPad. It’s one of the best digital planner apps, allowing you to maximize your creativity, productivity, and organization. Here's how you can use it:
Learning and Education
- Note-taking.
- Flashcards.
- Charts and diagrams.
- Problem-solving.
- Biology sketches and more.
Everything you do with a pen and paper can now be done digitally on your iPad with Noteshelf, making it one of the best digital planners for iPad.
Work and Productivity
- To-do lists.
- Branding and business planning.
- Meeting notes.
- Presentation preparation.
- Using an iPad planner for Noteshelf to organize your workflow.
Creativity
- Sketches and drawings.
- Diary management.
- Calligraphy and handwriting practice.
- Design concepts and collages.
Digital Planning and Organization
- Personal digital planner Noteshelf usage for scheduling and habit tracking.
- Budgeting and financial planning.
- Project organization.
- Bible study and journaling with a Bible notes planner.
4) Does Noteshelf Convert Handwriting to Text
Of course, yes! It's just that Noteshelf 2 has hidden this function in its menu.
- Start by writing with an Apple Pencil or other compatible stylus with your iPad or Android tablet.
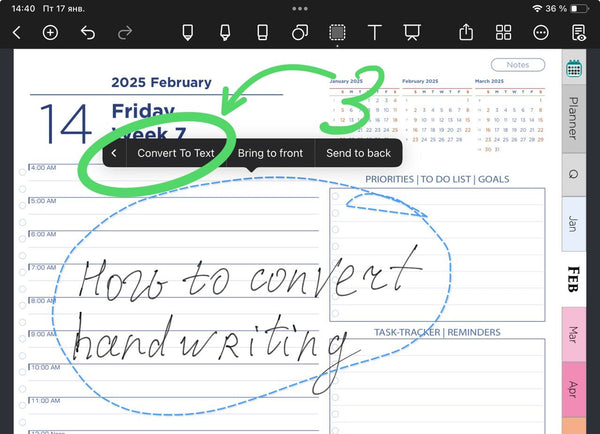
- Then use the Selection tool or Lasso Tool and select the handwritten text.

- Lightly tap the highlighted portion to bring up an additional settings menu.
This is where we need to reveal what the noteshelf has hidden from us.
Do as I did in my photo, open the menu and click - Convert to text.

- After that, you will see a new window where you will need to select
Copy converted noteshelf text to the clipboard.
or
Convert to textbox

- I chose Place on screen. And here are my notes in printed form.
Then you can select the Text tool in Noteshelf and edit the text, reduce the font size, change the font color, etc).
Who liked my article, pelase share it on social networks, and like my digital daily planner for Noteshelf - click here to see it in detail


Leave a comment